

Q911 Quick Start Guide
This guide covers cabling, first boot, serial console and network access for a new EXEC-Q911 or APEX-A100 board — start here while the board is still in the box; it ends with a shell prompt on the device.
Overview
The Q911 family is built around the Qualcomm® IQ-9075 SoC. The product line currently has three versions. The table below provides an overview of their differences and the items included in each packing list.
1x Cooler with Fan (secured onto the module)
1x 3.5” COM-HPC Mini Carrier (secured with the module)
1x Cooler with Fan (secured onto the module)
1x 60W power adapter
1x US power cord
1x Speaker*2 cable
1x D-SUB(F) cable (GPIO)
1x D-SUB(M) cable (CAN FD)
1x USB 2.0 A-TYPE(F)*2 cable
1x D-SUB(M) cable (COM)
1x 60W power adapter
1x US power cord
This guide focuses on the EXEC-Q911 and APEX-A100 platforms, providing an overview of their hardware and helping you get the system up and running quickly.
Each device ships with either Yocto Linux or Ubuntu pre-flashed on the UFS storage, allowing you to power on the system and log in immediately. If you need to re-flash or update the system image, please refer to the Q911 Image Flashing Guide.
What’s in the Box
You can refer to the packing list above to see what is included in the Q911 family.
EXEC-Q911 / APEX-A100 Hardware
Step 1: Prepare Required Items
Before you get started, please make sure you have the following items:
- DisplayPort (DP) monitor
- USB keyboard & mouse
- Ethernet cable
- USB Type-C cable
- USB-to-TTL serial adapter
- 60W power adapter
Step 2: Power On
Please follow the steps below to boot the system.
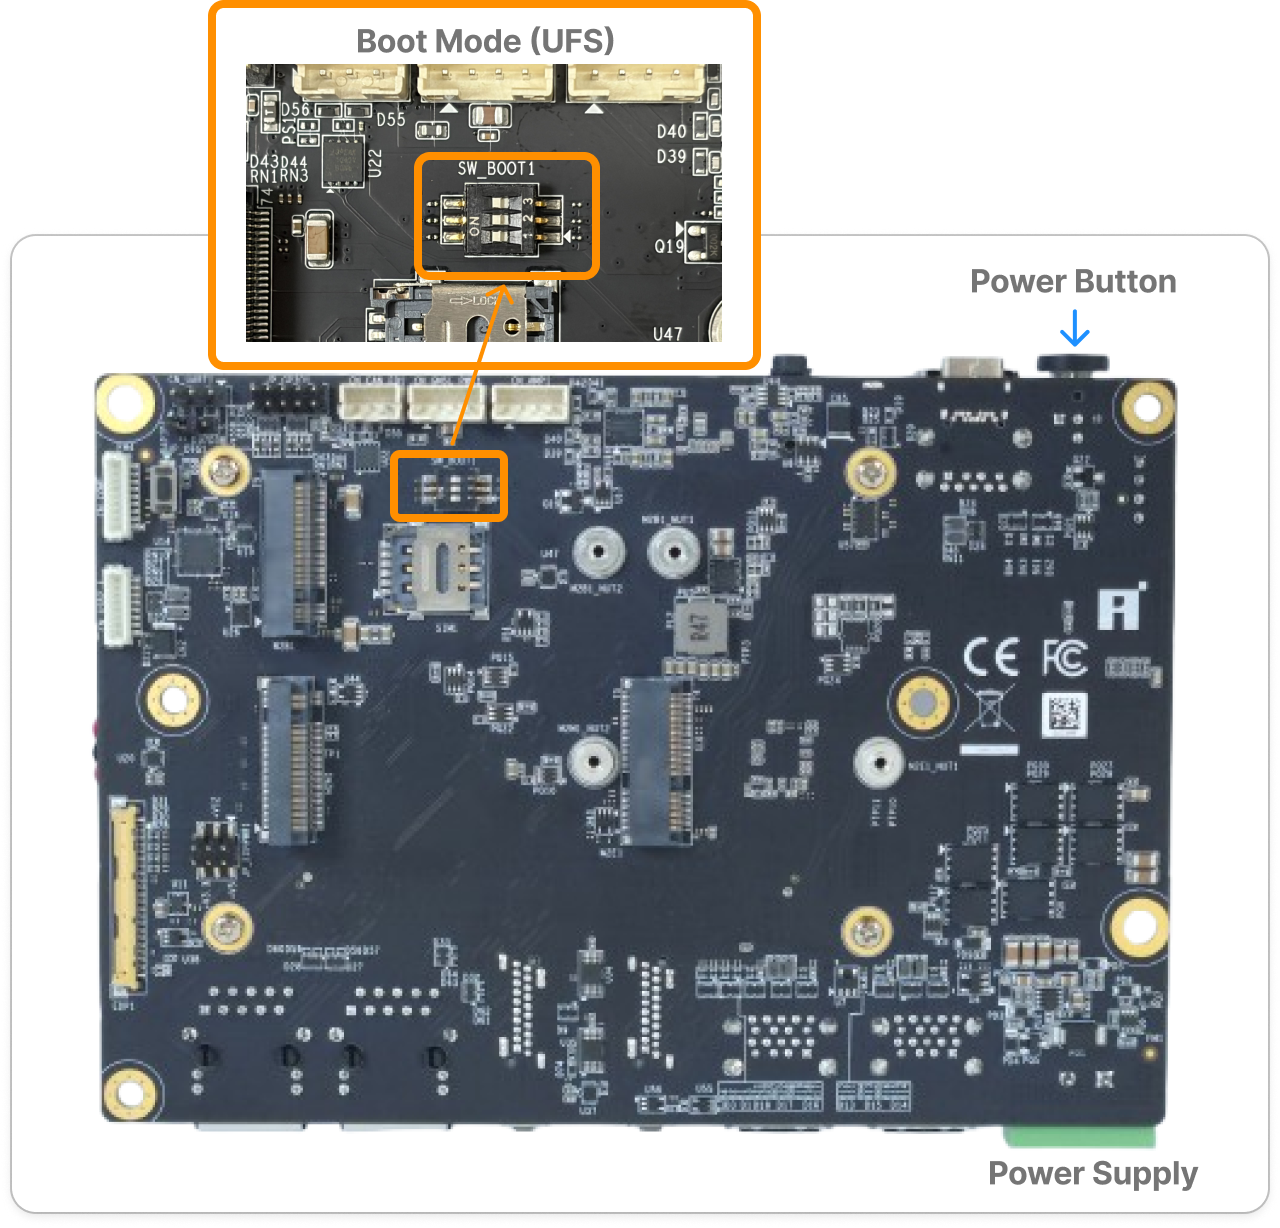
- 1Please ensure that the jumper on the bottom side of the board is set to
Normal mode.EDL modeshould be used when flashing the system image. - 2Please ensure that all boot mode DIP switches are set to
ON, so the system boots fromUFS. - 3Connect the power supply and press the power button to boot the system.
Step 3: Interact with the System
After the system boots, you can access the platform using one of the following methods:
Please refer to the Q911 Image Flashing Guide: Boot into the System for detailed instructions on flashing the image. For the networking steps Ubuntu needs on first boot, see First-Boot Network Setup.
Whether a login is required depends on the operating system and the access method:
| Usage method | Yocto Linux: login required | Ubuntu: login required |
|---|---|---|
| Desktop | No | Yes |
| SSH | Yes | Yes |
| ADB | No | Not supported |
| UART | No | Yes |
Default Credentials
First-Boot Network Setup (Ubuntu)
Ubuntu does not bring up Ethernet on first boot. Before any network operation, install the iq-ubuntu*.deb post-flash networking package. The install steps are in the Debian package part of iQ-ubuntu__manifest (no longer maintained since v2.5.1; merged into meta-iQ__manifest).
Interact with the System Using a DP Display
If you are accessing the system using a DP display, please follow the steps below to set it up.
- 1Connect the DP display and USB keyboard/mouse. Then, connect the power cable and press the power button to boot the system.
- 2After the device boots up, you should see the output displayed on the DisplayPort (DP) monitor.
- In Yocto Linux, you can click the icon in the upper-left corner to open the terminal.
- In Ubuntu, you can interact with the system just as you would on a standard amd64 Ubuntu installation.
Interact with the System Using SSH over Ethernet
If you are accessing the system using SSH to interact with the system, please follow the steps below to set it up. If Ubuntu does not have network connectivity, install the iq-ubuntu*.deb package. See First-Boot Network Setup.
Please connect an Ethernet cable and ensure that the device is reachable over the network. Then, connect the power cable and press the power button to boot the system. After the device boots up, you can access the device via SSH from any machine on the same network.
Interact with the System Using ADB over USB Type-C
If you are accessing the system using adb to interact with the system, please follow the steps below to set it up. The USB Type-C port on both platforms supports Flash / ADB.
ADB is not supported on Ubuntu. Use DP, SSH, or UART instead.
Connect the USB Type-C cable between the host and the device. Then, connect the power cable and press the power button to boot the system. After the device boots up, use the following commands on the host to verify the device connection and open an interactive shell. You can run Linux commands from the adb shell — the example below checks the BSP version.

Interact with the System Using UART Debug Console
If you are accessing the system using UART debug console to interact with the system, please follow the steps below to set it up.
You can refer to the Qualcomm guide on setting up a debug UART for detailed instructions on how to connect using minicom.
Please connect the USB-to-TTL serial adapter to the UART pins on the bottom side of the board. Then, connect the power cable and press the power button to boot the system. After the device boots up, you will see a screen similar to the one shown below.
Set your serial terminal to 115200 baud, 8 data bits, no parity, 1 stop bit, no flow control
Next Steps
Depending on your needs:
- iQ-Studio: It helps users quickly understand, explore, and prototype ideas by showcasing the platform’s performance and capabilities—inspiring innovation through hands-on experience.
- Application — Reference ready-to-run demos illustrating how to build applications on the platform.
- SDK — Learn how to develop and integrate your own solutions with the platform SDK.
- AVL(Approved Vendor List) — Provides guidance on verifying that the driver starts correctly on the system and quickly demonstrating the validated results.
- Benchmark — Review performance metrics for AI and system workloads.